Một khái niệm cũng rất cần thiết và quan trọng các bạn cần phải nắm được khi làm việc với WordPress đó là “Widget là gì?”
Widget WordPress là một block nội dung được đặt trong một vùng gọi là Widget Area hoặc Sidebar. WordPress đã cung cấp widget có sẵn như Recent Posts, Recent Comments,…
https://wordpress.org/documentation/article/manage-wordpress-widgets/
Ngoài ra, bạn có thể custom widget add vào theme của bạn.
Các bước tạo widget custom như sau:
1. Đăng ký NccTheme_Widget với action “widgets_init”
/*
 * Đăng ký custom widget item
 */
add_action( ‘widgets_init’, ‘create_ncctheme_widget’ );
function create_ncctheme_widget() {
	register_widget(‘NccTheme_Widget’);
}
2. Viết code cho class NccTheme_Widget
<?php
class NccTheme_Widget extends WP_Widget {
	public function __construct() {
		parent::__construct(
			'ncctheme-widget',  // Base ID
			'NccTheme Widget'   // Name
		);
		add_action( 'widgets_init', function() {
			register_widget( 'NccTheme_Widget' );
		});
	}

	public $args = array(
		'before_title'  => '<h4 class="widgettitle">',
		'after_title'   => '</h4>',
		'before_widget' => '<div class="widget-wrap">',
		'after_widget'  => '</div></div>',
	);

	public function widget( $args, $instance ) {
		echo $args['before_widget'];
		if ( ! empty( $instance['title'] ) ) {
			echo $args['before_title'] . apply_filters( 'widget_title', $instance['title'] ) . $args['after_title'];
		}
		echo '<div class="textwidget">';
		echo esc_html__( $instance['text'], 'text_domain' );
		echo '</div>';
		echo $args['after_widget'];
	}

	public function form( $instance ) {
		$title = ! empty( $instance['title'] ) ? $instance['title'] : esc_html__( '', 'text_domain' );
		$text  = ! empty( $instance['text'] ) ? $instance['text'] : esc_html__( '', 'text_domain' );
		?>
		<p>
			<label for="<?php echo esc_attr( $this->get_field_id( 'title' ) ); ?>"><?php echo esc_html__( 'Title:', 'text_domain' ); ?></label>
			<input class="widefat" id="<?php echo esc_attr( $this->get_field_id( 'title' ) ); ?>" name="<?php echo esc_attr( $this->get_field_name( 'title' ) ); ?>" type="text" value="<?php echo esc_attr( $title ); ?>">
		</p>
		<p>
			<label for="<?php echo esc_attr( $this->get_field_id( 'Text' ) ); ?>"><?php echo esc_html__( 'Text:', 'text_domain' ); ?></label>
			<textarea class="widefat" id="<?php echo esc_attr( $this->get_field_id( 'text' ) ); ?>" name="<?php echo esc_attr( $this->get_field_name( 'text' ) ); ?>" type="text" cols="30" rows="10"><?php echo esc_attr( $text ); ?></textarea>
		</p>
		<?php
	}

	public function update( $new_instance, $old_instance ) {
		$instance          = array();
		$instance['title'] = ( ! empty( $new_instance['title'] ) ) ? strip_tags( $new_instance['title'] ) : '';
		$instance['text']  = ( ! empty( $new_instance['text'] ) ) ? $new_instance['text'] : '';
		return $instance;
	}
}
$ncctheme_widget = new NccTheme_Widget();
Ý nghĩa của các method trong class cần lưu ý:
– Construct: Đặt tên, viết mô tả cho Widget và qui định chiều rộng hiển thị trong quản trị admin
– Widget: Triển khai logic các “widget options” and hiển thị cấu trúc HTML ở ngoài giao diện Frontend. Tham số “$args” được truyền vào là “HTML cho tiêu đề” và “content html” của widget class.
– Form: Hiển thị các options cho widget. Bạn có thể bỏ qua nếu widget của bạn không có option tuy nhiên hay để nó là empty ngay cả khi bạn không có options.
– Update: Lưu options của widget vào database. Bạn có thể bỏ qua nếu widget của bạn không có option tuy nhiên hay để nó là empty ngay cả khi bạn không có options.
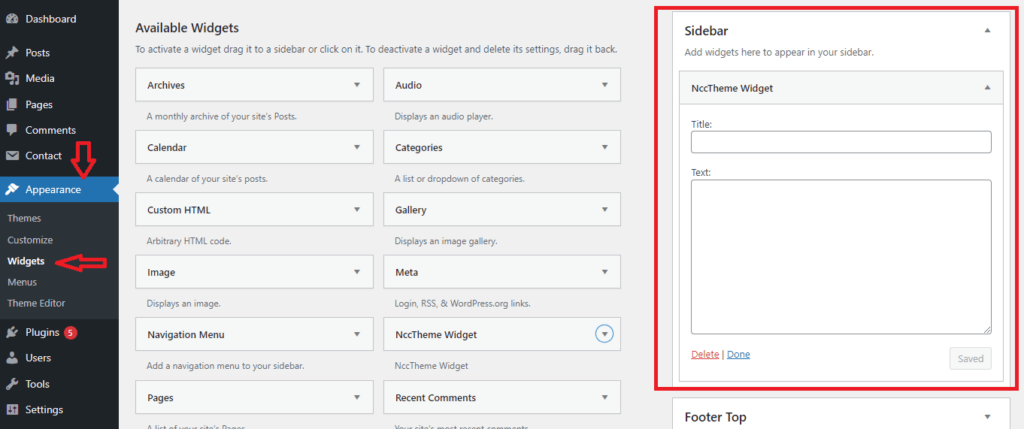
3. Đăng nhập vào giao diện quản trị và vào menu “Appearance => Widgets” bạn sẽ nhìn thấy NccTheme Widget bạn thêm.
Bạn có thể xem cụ thể cách tạo widgets tại document này:
Cụ thể cách tạo widgets
Ngoài ra để viết được theme và child theme, bạn cần nắm những khái niệm sau:
+ Action Hook, Filter Hook
+ Shortcode